100
WATT UL AB1 MONO BLOC 2014
This page has more information about details of a push pull 100W
Ultralinear class AB1 monobloc amp.
I did build and sell a pair of 100W UL amps in 2004, and I
composed the webpage about them at
monobloc 100W ULAb1 amp.
Emails from ppl around the world have propelled me to compose this
new page with properly drawn
schematics using MSPaint instead of scans of drawings on paper.
Between 2004 and 2014 I learnt
a more about tube amps so this page includes more than the 2004
page.
This page is about :-
Fig 1. Schematic Sheet 1, 100W ULAB1 Amplifier, 1 x 6SN7 input, 2
x 6SN7 driver, and 6 x EL34 in UL
output stage. This is a re-drawn schematic of 2004 with minor
improvements.
Graph 1. Output power vs RL, with THD approx at clipping levels.
Table 1. Use of Hammond 1650T with real world speaker impedance
values and how that affects the sound.
Fig 2. Schematic Sheet 1, REVISED 100W ULAB1 amp, 1 x 6CG7 input,
2 x EL84 triode driver,
and 6 x EL34 / 6CA7 output stage.
This is a new schematic for 2014 with major tube changes and
includes BALANCED FIXED BIAS.
Fig 3. Schematic Sheet 3, Protection, Delayed B+, Bias Balance
Indicator, Clipping indicator.
This has a much improved amplifier management circuit to control
behavior of tubes during
times when they may become troublesome due to tube aging, short
circuited speakers and cables,
owner stupidity, early random tube failure, use of dodgy NOS tubes
maybe 60 years old,
etc, etc, etc. You don't want to see your house burn down do you?
Fig 4. Schematic Sheet 2, REVISED power supply schematic rated for
380Watts and shown here
for 6 x EL34 / 6CA7. This power supply can be applied for use with
a wide range of output tubes
including 6 x EL34, 6CA7, 6L6GC, KT66, 807, 5881 in a 100W
monobloc, or for TWO channels
each 50W with 4 x EL34, 6CA7, 6L6GC, KT66, 807, 5881.
The 380W PSU could suit 100W monoblocs with 4 or 6 x 6550, KT88,
KT90, KT120,
or TWO 50W channels, each with 2 x 6550, KT88, KT90, KT120.
Fig 5. Schematic Sheet 1, 100W UL AB1 amp 1 x 12AU7, 2 x ECC99, 6
x EL34.
Fig 6. Schematic Sheet 1, 100W UL AB1 amp 1 x 12AU7, 2 x ECC99, 4
x KT120.
Fig 7. OPT bobbin winding details and core details.
Fig 8. OPT Primary and Secondary terminations and many available
load matches.
-----------------------------------------------------------------------------------------------
Fig 1. Re-drawn 2004 schematic of 100W amp with 6 x EL34,
with minor improvements.
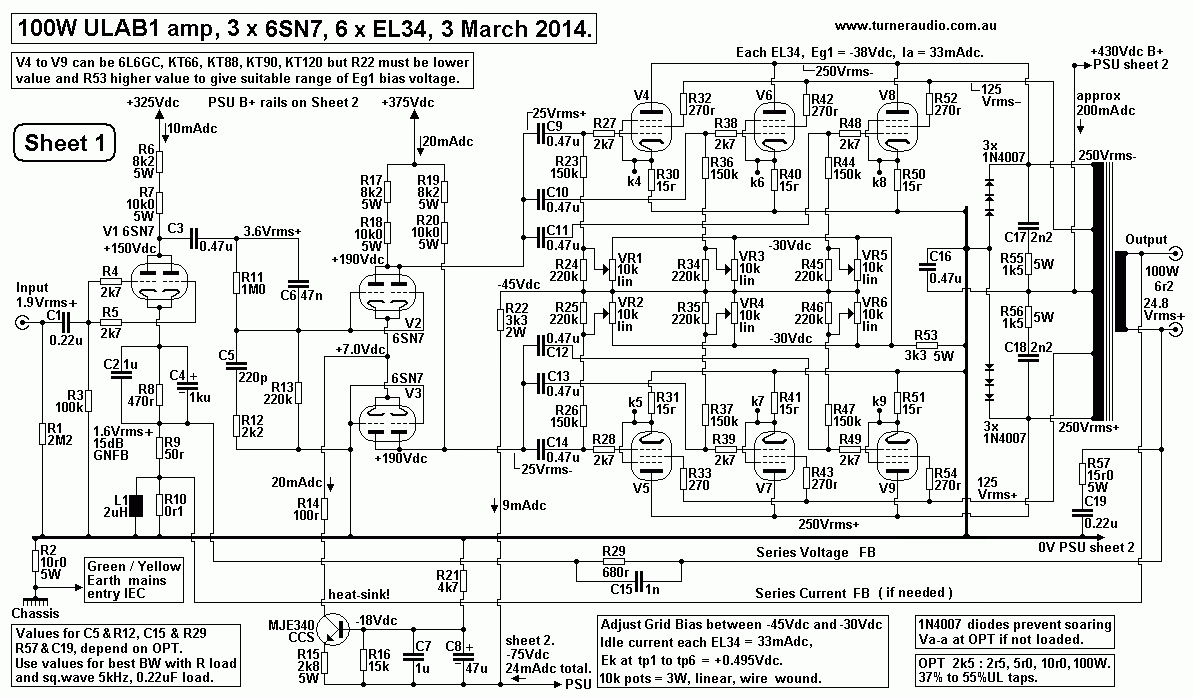
Fig 1 is very similar to the 2004 100W UL Ab1 at monobloc
100W ULAb1 amp
The general description of how all the amps on this page work
remain the same, although I recommend the idea
of using balanced biasing which is detailed below.
Anyone building a 100W PP amp as I have shown here MUST use use my
schematic as a GUIDE ONLY.
Unless you can source exactly the same PT and OPT, you cannot make
an exact copy of what I have achieved,
and the best most DIYers of manufacturers can do is choose PT and
OPT which comply with basic requirements.
The ready made odd the shelf purchased PT and OPT will all have
slightly different properties to what I show in
all my schematics.
Very few ppl will try to wind their own 100W rated OPT or have one
custom wound. I do have details for a custom
wound OPT at the bottom of this page.
-----------------------------------------------------------------------------------------------------------------------------------------------------------
But let us explore the power able to be produced by 6 x EL34 with
different loads.
Graph 1.
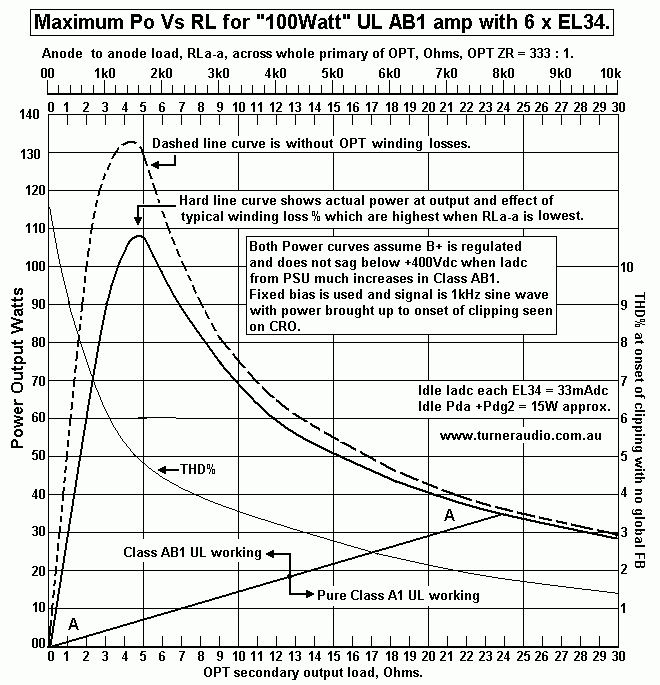
Graph 1 is based on using 6 x EL34 with UL OPT with screen taps at
about 40% in a UL amp.
The B+ is assumed to be regulated and fall no lower than +400Vdc
at the maximum possible Po generated by the tubes.
In the real world, B+ rails are seldom regulated so that in real
amps the idle B+ might be 430Vdc, but it will drop to 400Vdc
with with a continuous sine wave signal at high levels, using
silicon rectifiers and at least a 235uF C1 reservoir cap
followed by say 3H choke with less than 33r0 winding resistance
and another C2 235uF. Having a charge limiting
resistor in series with HT winding and diodes or having tube
rectifiers will give a much bigger B+ drop when input Idc
may be 3 times the idle Idc when RLa-a is low for nearly all class
B operation.
While average low levels of a few watts will not cause B+ drop,
brief transients in music such as loud drum beats lasting
a very short time may reach up to clipping levels. But the
duration of transients is low and the time constant between C2
cap and load is much longer so B+ will stay up at the idle level,
so the instantaneous power of transients will reach up to
a power level maybe 10% higher than the solid line curve on Graph
1.
Graph 1 shows the power levels at clipping with secondary loads
between 0r0 and 30r, using an OPT with 333:1 ZR,
( nominally 2k7 : 8r0 ) and using fixed bias, and using a
continuous sine wave signal between 400Hz and 1kHz .
The dashed line curve shows the Po if the OPT had zero winding
resistance. The solid line curve shows Po with a typical
OPT that has 10% total winding losses for where output RL = 1.5 x
load for maximum possible Po. In this case, with output
load = 5r0, OPT primary anode load = 1k7, and maximum possible AB1
power occurs and winding losses are about 14%.
But with sec load = 7r5, primary load = 2k5, and winding losses
are about 10%. Winding resistance losses are highest when
amp is in class AB with low RLa-a, and lowest with anode load of
say 7k8 when losses = 3.3% and Po is mainly class A.
With 6 x EL34 and a good OPT, there is plenty of Po and no need to
worry about winding losses at all.
Graph 1 shows THD% with NO GNFB. It is mainly 3H up to 30W, but
then has 3H, 5H, 2H, 7H near clipping levels.
The GNFB reduces all this crap to negligible levels. Above
straight line A-A, Po is class AB1, below is pure class A1.
The EL34 are biased for idle Pda = 15W which seems very low, but
they have less tendency to overheat,
and they will last a long time.
There is adequate OPT construction information further down the
page, but DIYers might just buy a Hammond 1650TA.
It is 14lbs, or 6.4Kg, with load ratio, ZR = 1k9 : 4r0, 8r0,16r0,
rated for 120W.
This means that the Va-a = 477Vrms with RLa-a = 1k9. Va peak swing
at each end of primary = 238Vrms = 337Vpk.
Load line analysis would tell you you would want Ea > 450Vdc,
and there could be 120W generated by anodes.
But if winding losses were 14%, when using 4r0 outlet, then expect
103W max at output, and with a sec load of 3r4.
14% would not be unusual with 4r0 output because only half the
secondary copper is being used.
The total primary and secondary winding resistance looking into
primary could be 266r.
Unfortunately, if you have "4r0" speakers which may have dips to
2r5 along the AF band, you cannot get a load match
to give anode load more than "1k9".
If you have 8r0 speakers, they may be connected to 4r0 outlet to
get nominal 3k8 : 8r0 ratio, and losses are 7%.
In other words, for better hi-fi, always use the 4r0 outlet. The
16r0 outlet is completely useless.
-------------------------------------------------------------------------------------
The Hammond 1650RA could be used, rated for 100W for 5k0 : 4, 8,
16, with tapped sec. Idc rating is 318mAdc,
more than needed. Weight is 12lbs, 5.45Kgs. Its rated for
30Hz to 30kHz.
When using 5k0 : 16r0 loading, and class AB1, losses = 4%, after
calculating from the Hammond .pdf data sheet.
But with 5k0 : 4r0, losses are 7.8%. But use of 4r0 speakers the
dip in RL value to 2r5 gives RLa-a becomes 3k1,
and quite tolerable. Screen taps are at 42%. So the Hammond 1650R
seems like a good match for 6 x EL34,
( or for 4 x KT120.) A single KT120 can do what 2 x EL34 can.
For 100W AB1 at output with 5k0 : 4r0, losses are 7.8% so the
tubes need to generate 108W, 735Vrms.
at each anode there is 367.5Vrms = 519.6Vpk, ans the Ea would have
to be about 580Vdc, which is unsafe for
EL34 in UL mode. So don't expect 100W into 5k0 RLa-a. To get 100W
using 4r0 tap, you would need to use a
lower RL of say 1r6, to lower the anode load to 2k0, but then
winding losses become 19.5%, and you need
120W at anodes, and it is possible with 1r6 at 4r0 tap. Nobody
uses 1r6 speakers.
If the 4r0 load is moved to 8r0 outlet, then OPT works as 2k5 :
4r0 with about 8% losses. My loadlines tell me that
with Ea = +450Vdc, expect 120W with primary load of 2k5, and art
output you may expect 110W with 3r7 load at
the 8r0 outlet. This seems acceptable, but the interleaving on
Hammond PP OPTs is not so hot, and you may
struggle to make the amp unconditionally stable.
In the amp, I suggest at least 15dB of global NFB is required to
improve the performance, and 20dB GNFB might
be used, but only if you are really clever and while obtaining
unconditional stability and bandwidth from 30Hz to 50kHz
with a resistance load, at full Po based on 400Hz level at onset
of clipping.
My conclusions:-
(1) Hammond 1650TA If you insist you MUST HAVE 100W for a "4 ohm"
speaker with , AND, you don't care about
the amount of class A for the initial few watts, then use 4 x 6550
/ KT88 at least.
(2) Hammond 1650RA seems to be a more usable OPT for hi-fi and
large amounts of Class A1.
(3) Hammond should forget having a 16r0 outlets. It is mainly
useless, because there are so few "16 ohm" speakers
made and instead they should have OPT secondaries suitable for
2r0, 4r0, 8r0, which means they have to revise all
their OPT designs which probably were designed in 1950s. Don't
hold your breath.
(4) Many Audiophiles PREFER a high amount of class A power because
they may only a maximum of 10W. EL34 are
cheap when it is time to re-tube, and one could always use 6 x
6L6GC or KT66. One might even use 4 x 6550 KT88
and leave two tube sockets empty. Therefore a 16r0 speaker can be
used on the 4r0 outlet of 1650TA. This may give
RL a-a = 7k6 and give about 37W of nearly all class A. Any dip in
load RL will be well tolerated, and if Z min = 8r0, then
maximum Po < 62W, with class A > 20W. Very few ppl have 16r0
speakers, unless they are specially made using identical
4r0, 6r0, 8r0 drivers in series.
(5) Some audiophiles would much like to use "4 ohm"
speakers, or some other brand where the speaker impedance is
even lower than 4 ohms, AND they want 100W, all CLASS A power.
The 1650RA 1k9 : 4r0 will not be OK because RLa-a just will not be
high enough.
(6) The 1650TA 5k0 : 4r0 will be OK, but they cannot have 100W of
pure class A. The class A Po maximum can only
ever be about 42% of the idle Pda. If 6 x EL34 were idled at
20W each, then available max class A = 51.6W. NOT 100W !
The 5k0 RLa-a load would allow Ea to be lowered to +400Vdc and Ia
could be 50mAdc.
The 50W class A would give low THD and best sound and allow triode
connection if desired.
--------------------------------------------------------------------------------------------------------
Before building and amp like this, think everything through,
because I will NOT be there to correct your many
inevitable mistakes unless you have a large amount of previous
experience!
Be prepared to make a few changes of the listed values I have for
L1, R10, C5, R12, C15, R29, C19, R57.
All these R&C parts must be confirmed to be effective for
stability which depends on the properties of the OPT which have
a huge effect on how it works with NFB applied.
In 2004, the OPT I wound for my customer's amp I sold had more
primary inductance and less leakage inductance than
any large Hammond OPT. Values for parts on schematic listed are a
GUIDE ONLY. If you just use what I show and hope
for the best without testing it properly and optimizing the LCR
values, the amp may oscillate, misbehave, sing badly, or
and smoke!!!!
Sometimes a DIYer needs to have a tech inspect and correct his
mistakes. Most DIYers and many so called audio techs
and engineers have very little knowledge of how to gain
unconditional stability in amps, especially tube amps.
The 100W amp is a real challenge.
There are probably better and simpler ways for biasing adjustment
as well as different input and driver tubes for better
dynamics.
Fig 2. 100W ULAB1 amp, 2014, 6CG7 input, 2 x EL84 triode
drivers, and balanced fixed biasing.
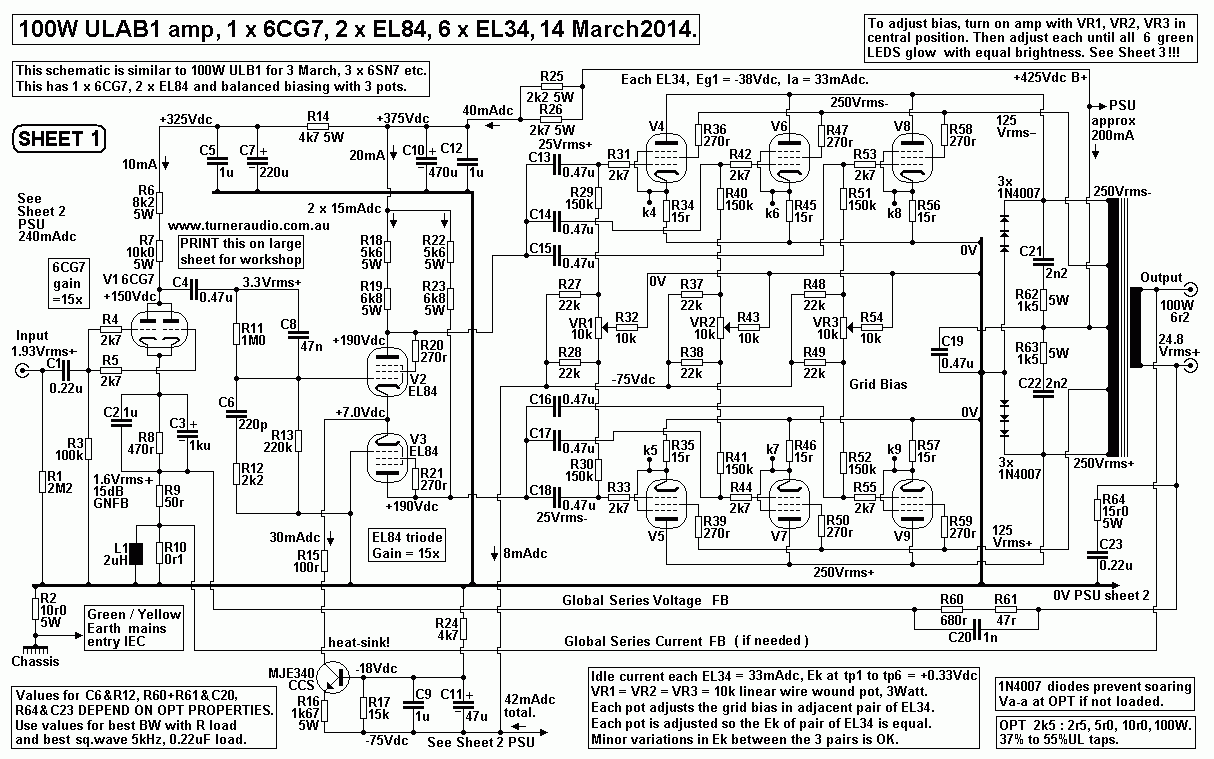
Fig 2 is very similar to Fig1, but V1 is a paralleled 6CG7 which
operates identically to 6SN7 but has a mini 9 pin socket
which allows more V1 changes if desired, such as 6DJ8, 12AU7,
12AT7, ECC99, or trioded EF80, etc. But any change
from 6CG7 shown here will require change to ohm value of R8 so
that the Ea shown remains the same at +150Vdc approx.
Exceptions would be for 12AY7, which would need Ia to be lower at
5mA and so R6, R7 also must be altered.
Fig 2 shows V2 & V3 as a pair of EL84 in triode in a
differential pair driver and phase inverter. EL84 in triode are
cheap and
plentiful and make superb preamp tubes and driver tubes.
Each EL84 in triode is the equivalent of 5 paralleled 1/2 sections
of 6SN7 or 6CG7. The Ra of the trioded EL84 with Iadc at
15mA is about 2k2, so the loading effect of multiple paralleled
output tubes is negligible so the music is better.
Fig 1 shows biasing with six bias adjust pots, one for each output
tube to set the idle Iadc.
But adjusting grid bias voltage Eg1 on one tube slightly affects
the Ia bias condition of others which makes adjusting bias
tedious because it needs to be repeated several times, and many
audiophiles get the whole process hopelessly wrong,
and end up with some tubes far too hot while others are cold.
Fig 2 shows a considerable change to having BALANCED FIXED BIAS.
Rarely has any manufacturer ever used this
wonderful idea because most of them are backward thinking old
fuddy duddies.
Fig 2 output stage is based on the idea of having the six EL34
working as three parallel pairs of tubes with each pair
set up for bias similarly to the one pair of tubes in my 5050
integrated amp.
Consider V4 and V5. There is a real fixed Eg1 grid bias Vdc
derived from a -75Vdc rail and use of R divider formed by
R38+R38 each 22k, VR2, 10k0 linear ww 3W pot, and R43, 10k0 to 0V.
If VR2 is set to center position, the Eg1 bias
applied to V4+V5 grids = -39.9V. R34+R35 are each 15r 5W, and
allow the combined Ia + Ig2 to measured for each EL34.
The 15r0 has negligible effect on tube signal operation.
VR2 will need to be adjusted to increase Eg1 in one EL34 while
reducing Eg1 in the other to get the same Ikdc flow in
R34+R35, ie, the Vdc from test point k4 to k5 = 0Vdc.
In the other two pairs of EL34, V6+V7, and V8+V9, the Ikdc can be
balanced for each pair in the same way.
The Ikdc in any one pair may be slightly different to the next
pair along, but that makes no difference to operation
if the Vdc between test points at the 0V rail are all at 0.705Vdc,
+/- 15%.
If one tube has a short circuit or becomes an open circuit, then
balancing becomes impossible. The protection circuits may
shut the amp down if one or more EL34 conduct too much Ikdc.
In all PP amps, it is most important to have very nearly equal Idc
in each 1/2 of the OPT on each side of center tap which
receives the B+ current. The 1/2 primaries have Idc flows in
opposite direction and these should be equal so that the iron
core of OPT does not become magnetized by any difference in Idc.
A small net difference in Idc makes a flow in one direction across
all the primary, and because the PP OPT has no air gap
and core has high permeability, it will saturate easily with
unbalanced Idc. If this happens, the music turns to mud, with
high distortion levels.
But how does anyone know when all pairs of tubes in a PP output
stage have equal Ikdc?
Two methods are used. One involves holding two probes of Vdc meter
from one cathode to the other
in each pair, and then turn the balance pot until a reading of
0.0Vdc is attained as explained above.
The other method is to have the three pairs of test points
connected to three differential amps using small bjts arranged
so each amp drives two green LED. When balanced Ikdc is present,
the two LED will glow equally brightly. The LED tell
an owner if balance is OK and if it is, you see 6 green LEDs, and
biasing is OK, nothing to worry about. If one tube conducts
too much Ikdc, or not enough Ikdc, then only one LED will light up
and if their brightness cannot be equalized with the bias
balance pot then the Ikdc cannot be balanced so something is wrong
with at least one EL34 of the pair, and a volt meter will
confirm this. A new tube is plugged in and if balance is easily
restored, the problem is fixed.
----------------------------------------------------------------------------------------------------------
Fig 3 below is a schematic which shows the differential amps
for balance monitoring and other features which make life with
an amp like this much more civilized.
Fig 3. Amplifier Protection, Delayed turn on, Clipping
indicator, and bias balance indication. 2014
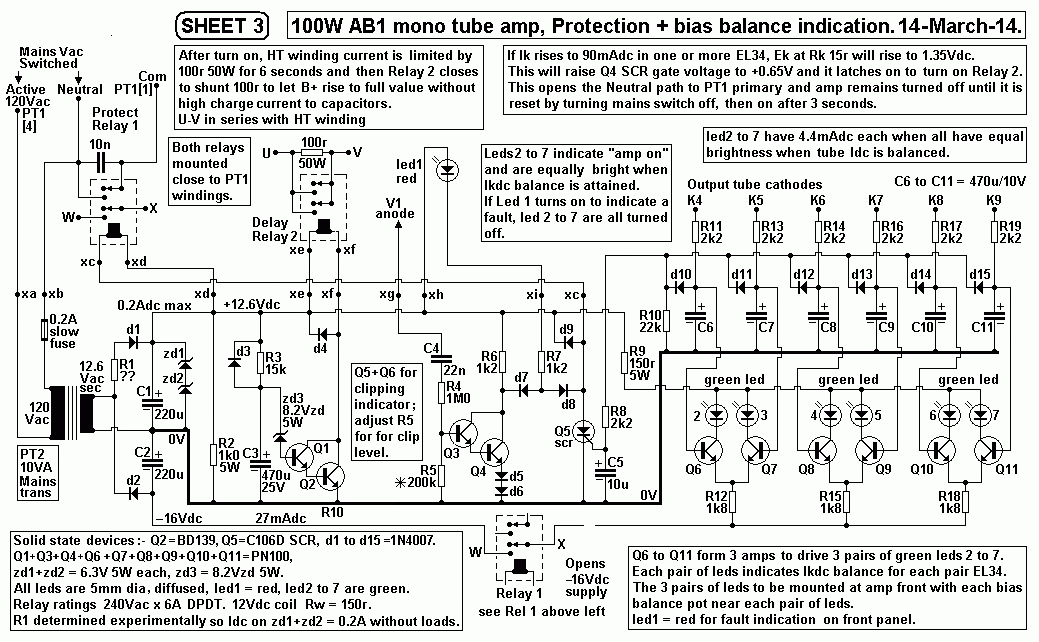
1. Bias balance indication :-
See the three simple bjt differential amps formed by Q6 to Q11.
Please consider just V4 and V5 which form one of the three
parallel pairs of output EL34. Their cathode Ek voltage at k4 and
k5
are fed through 2k2 and 470uF low pass filters to ensure mainly
only Vdc with little signal Vac appears at tops of C6 and C7.
The two Vdc voltages are applied to Q6 & Q7 bases. Only a
small amount of Vdc difference at bases is needed to make a
large difference in collector currents. So if the Vdc difference
between Q6 and Q7 bases = 0.1Vdc, one led glows brightly while
the other may be unlit.
As the bias balance pot is turned, the base Vdc can be equalized
and close to equal collector current flows in Q6 & Q7 so LEDs
glow equally bright, and Ikdc in each tube is equal.
Common emitter R12 makes the differential action possible by
ensuring the current increase in Q6 equals current decrease in Q7.
The 2k2 should be within 1% tolerance or else the small base input
current base current will generate different Vdc across these
R and good balance will be impossible.
The bjts I used for trials of the amp circuits was PN100, a very
common small signal TO92 npn transistor costing less than 10c
each, if a packet of 50 is bought. I found that randomly picked
pairs of PN100 all gave splendid balance despite some possible
hfe differences. Always use LEDs from same batch so when equal
current flows the brightness is equal. It is remarkably easy to
see which led is brighter than the other, and how close the pairs
of Ikdc will be if you measure test points with a meter, .
2. Protection :-
All tube amps are prone to one or more output tubes conducting too
much Idc for long enough to overheat the tube which leads
to its self destruction. This is called bias failure, and may be
due to air entering the tube slowly or excess heat deforming the
shape of grid or screen wires. Instead of a 40mAdc flow in tube,
it rises to say 400mAdc, maybe not enough to blow a mains fuse,
and tube glows orange hot until something inside shorts, and then
a fuse blows. This event can last long enough to generate 16W
of heat in a 100r OPT winding. The insulation melts, wires short
together, and you need a new OPT and a tube. Shorted speaker
leads even with a small signal or a jammed voice coil may cause
this kind of tube failure In many old amps, the OPT primary
wire was only 0.2mm dia and Rw for each 1/2 primary was 125r, and
if a saturated KT66 caused OPT failure, and perhaps
damage to PSU parts.
A minor proportion of tube failure is due to spontaneous breakdown
well before coming close to average tube life which can be
many thousands of hours. Failure of input or driver tubes seldom
causes any expensive damage.
In Fig 2, all the cathode current sensing resistors will produce a
Vdc which will rise during normal use when volume level is turned
up beyond the region of initial pure class A. Very few ppl will
use more power than these first few watts. But when volume is
raised,
class AB action begins and Ikdc will rise and then Ek will rise.
In the amps here, the rise of Ek during class AB is usually very
similar and the LEDs showing balance status will remain equally
bright unless some large AB transient peaks occur for long enough
and balance changes slightly.
The Vdc at the tops of 470uF C6 to C11 are all connected via six
diodes to a rail which powers the gate of a sensitive SCR, C106D.
R8 and C5 offer additional signal filtering at SCR gate which we
want to only react to Vdc. If the gate voltage exceeds about
0.65Vdc,
the scr *latches* on, causing the relay to turn on and open the
contacts which interrupts the mains energy to PT1 primary winding.
So the amp gets turned off automatically if excessive Ikdc occurs
in one or more EL34.
If the Ek of any tube reaches 1.2Vdc, or Ikdc reaches 80mAdc for
long enough, the SCR turns on. 80mAdc is 2.3 times the normal
35mAdc at idle. If an EL34 tube ages or becomes gassy the Eg2 bias
may not control Ia which then may increase to 300mAdc.
This means tube heat = 127W, anode will glow red / orange hot and
screen wires may melt down and glass may soften and B+ may
short circuit to 0V thus blowing a fuse. To avoid the
pyrotechnical display, the SCR trips when Pda reaches 34W, just
above the
maximum Pda rating of 28W for EL34. Excessive signal Iac could
cause Pda to rise and if peak Ia in an EL34 = 0.25A, and the wave
has become 1/2 a square wave then average Ia can reach = 0.45x
0.25 = 0.11A, and Pda = Ea x average Ia = 425V x 0.11 = 46W.
If the condition is sustained for a minute or two, the tube is
doomed.
In any amp is meant to use a 6r0 load, it is difficult to over
heat tubes if the speaker load is always 6r0 or higher. But if a 3
ohm load
is used and volume turned to just over clipping with a sine wave
for more than 3 seconds, the amp will be turned off because Ek
will
rises to 1.2Vdc when a high level is reached. The amp may tolerate
3r0 or even 2r0 load at low levels, but you have been warned !
But suppose there is a short circuit in a speaker cable or within
a speaker. When volume is turned up with music signal there is no
output voltage but there is very high output current which raises
Ek very quickly and the the amp is immediately turned off.
There is no direct protection against an intermittent short
circuit where levels are low. For example, I once repaired a
Quad-II amp
which had been powering an old Quad ESL57 with a midrange panel
which began arcing when output voltage went above 1.5Vrms.
The speaker impedance reduces to about 1r5 during arcing, and this
heated up KT66 which went red hot and overheated the PT.
Smoke billowed forth, and a bad smell, and luckily the amp was
turned off before major damage. I later put in protection circuits
and the owner bought new speakers. Dynamic speakers can become
damaged with overheating by excessive levels when teenagers
are allowed near a volume control. Typically, a voice coil of a
bass speaker will heat so much the glue holding wires on aluminium
former melt and the coil will then jam tight in the magnetic gap
between iron poles of magnet. This reduces the speaker impedance
to the amp overheats and can cook to death.
When Q5 SCR is triggered, it becomes a very low resistance and
turns on Relay 1 and LED 1, which indicates amp has been turned
off and a fault exists. Relay 1 is a Double Pole Double Throw and
has two sets of contacts. One set is for the opening of the
Neutral line and the other set is used to open the negative -16V
rail to the emitter resistors to Q6 to Q11. This prevents current
flow in bjts Q6 to Q11, and LEDs 2 to 7 turn off. So when the amp
is turned off, the six green led are extinguished and there is
just
one red led glowing to tell an owner something is wrong.
The power source for the protection circuit and the bjt
differential amps comes from PT2 which is at least 7VA.
This transformer continues to work when a fault causes PT1 to be
turned off.
The amp may be "reset" by simply turning the mains switch off,
then on again a couple of seconds later. If the fault persists,
the
amp will turn off again.
I have repaired many solid state amps which have had their output
transistors plus driver stages severely damaged by heat from
one reason or another. Tubes are slightly more capable of overload
for longer, but the only solution when overload occurs is to turn
off
the amp. Unlike SS amps, tube amps cannot have Idc in their OPT
secondary windings so no relay is needed to disconnect speakers
from the amp.
Of course in many SS amps I repaired, the speaker relay might
open, but the amp stays turned on and the bjts fry to death in
less than
a second. Turning off any amp with a fault is the best solution.
Delayed B+ application :-
Immediately after turn on the mains input current is very high for
2 main reasons. All tube heater elements have low resistance when
cold.
Higher than normal working current flows until the heat raises the
heater element resistance. However, the high input current is not
so
high that any current limiting is required.
But there is much higher peak input current flow in mains winding
during initial magnetization of the PT core and the initial
charging up of B+ rail capacitors. These high "inrush" currents
may require a mains fuse with high Amp value so it does not blow
at
turn on.
The high fuse value would allow mains input current to continue
even if bias failure and excessive Idc flowed in output tubes, so
the
high value fuse is not effective against bias failure if the
protection circuit does not work. To enable a lower fuse value
that will blow
when other protection measures fail the inrush current to
capacitors needs to be limited by a series resistance in the HT
winding or in
the mains winding. I have arranged the circuit in Fig 3 so the B+
will rise to 2/3 its full value within 5 seconds with 100r at 50W
rating
in series with HT winding.
After 5 seconds, the 100r is shunted by Relay 2. The B+ then rises
to its maximum possible voltage of about +460Vdc.
The peak current input at turn on and after 5 seconds when 100r is
shunted is about 1/2 what would occur without the delayed relay.
Hence a fuse of useful value can be used. During the delay period,
the fixed bias voltage establishes and after about 10 seconds the
tubes all begin to conduct but Ia is gently turned on, and B+ is
pulled down to +430Vdc for normal operation.
If the amp is turned off, then back on again after say 3 seconds,
then heaters are still hot and Ia pulls the B+ level down. But
when
turned on again the Delay Relay is activated again and any surge
in tube current or mains input current is avoided and B+ is raised
slowly again to maximum.
Delay Relay 2 is controlled by Q1 & Q2 Darlington pair which
is turned on after about 5 seconds by base voltage delayed by R3
and C3 which have a time constant of 7 seconds. When C3 voltage
has risen to about +10Vdc, the 8V zener diode conducts to
turn on Q1 and Q2 and 100r x 50W is shunted between points U and
V. The diode across R3 15k allows fast discharge of C3
when amp is turned off, so that when turned on again quickly there
is a delay before the 100r is shunted.
All these measures ensure maximum tube life and save repair
expenses.
Clipping Indicator :-
Its not essential to know if a hi-fi amp clips, but it is handy,
especially if one speaker has a shorted cable. To do this, a
sample of
signal from V1 anode is fed through high resistance network of C4,
R4, R5. The bjts Q3 & Q4 form a high input resistance
Darlington pair. The V1 anode signal voltage will suddenly rise to
a high level when the amp clips. Then Q1 base voltage
becomes high enough to turn on collector current which flows in D7
and R7 and red led1 is turned on. It will flash on
the peaks of signal current to give a warning that clipping has
begun. Clipping with a high value speaker ohm load will
not cause high cathode current so the protection Relay 1 is not
activated. Clipping the amp with high value speaker loads
does little damage, ( except to listeners ears ). But if a low
load of say 2 ohms is used, excessive input signals will easily
cause clipping and high Ikdc and amp will be turned off by Relay
1.
Reliability of Protection :-
If the PT2 becomes faulty and +/- 16Vdc PSU rails remain at 0V,
the 6 green leds will not light up after turn on, and the
Delay Relay 2 will be turned on to shunt the 100r. B+ cannot rise
to full value. The normal EG1 bias voltage will be
established, but Ia and Ig2 will not rise to wanted values, and
tubes will have low Pda and be over-biased for the low B+.
The amp distortion will be high, but it cannot be damaged if used.
There are more complex schemes to ensure the amp
cannot turn on unless the protection circuit rail voltages have
been established. I do not think the extra complexity is
necessary. Protection circuits are needed, but they do not have to
work very often, and the parts I use are all easily
replaced if needed.
---------------------------------------------------------------------------------------------------------------------------------------------------
The 100W amp needs a good PSU. I have come up with a 308VA rated
design which allows 6 x EL34, 6CA7, KT66,
6L6GC, 6550, KT88, KT90, KT120.
The larger octal 6550 to KT120 allow a higher idle bias Ia and
Ig2, and thus there will be more initial class A power than
for EL34.
It will be found that a quad of 6550, KT88, KT90, KT120 will do at
least the same work as 6 x EL34, and the same PSU
can be used but with one less differential amp for balanced bias.
Fig 4.
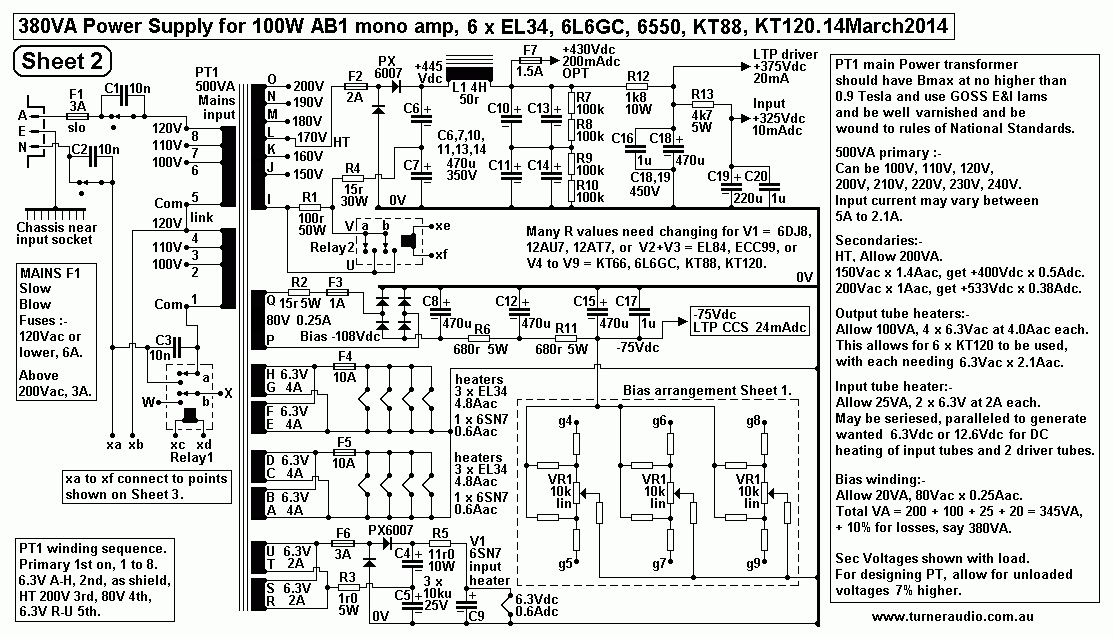
The PSU schematic has B+ produced with voltage doubler rectifier
using 6 amp x 100PIV rated Si diodes.
Many will want to use a bridge rectifier with HT winding with taps
between 300Vac and 400Vac, but then the Delay Relay
2 is exposed to over 250Vac, and most easy to get relays don't
have voltage ratings above 250V.
I don't have much more to say about the PSU I have drawn here
because anyone can see the text within the schematic.
-------------------------------------------------------------------------------------------
Fig 5. 100W UL AB1 amp with 1 x 12AU7, 2 x ECC99 and 6 x
EL34 and balanced biasing
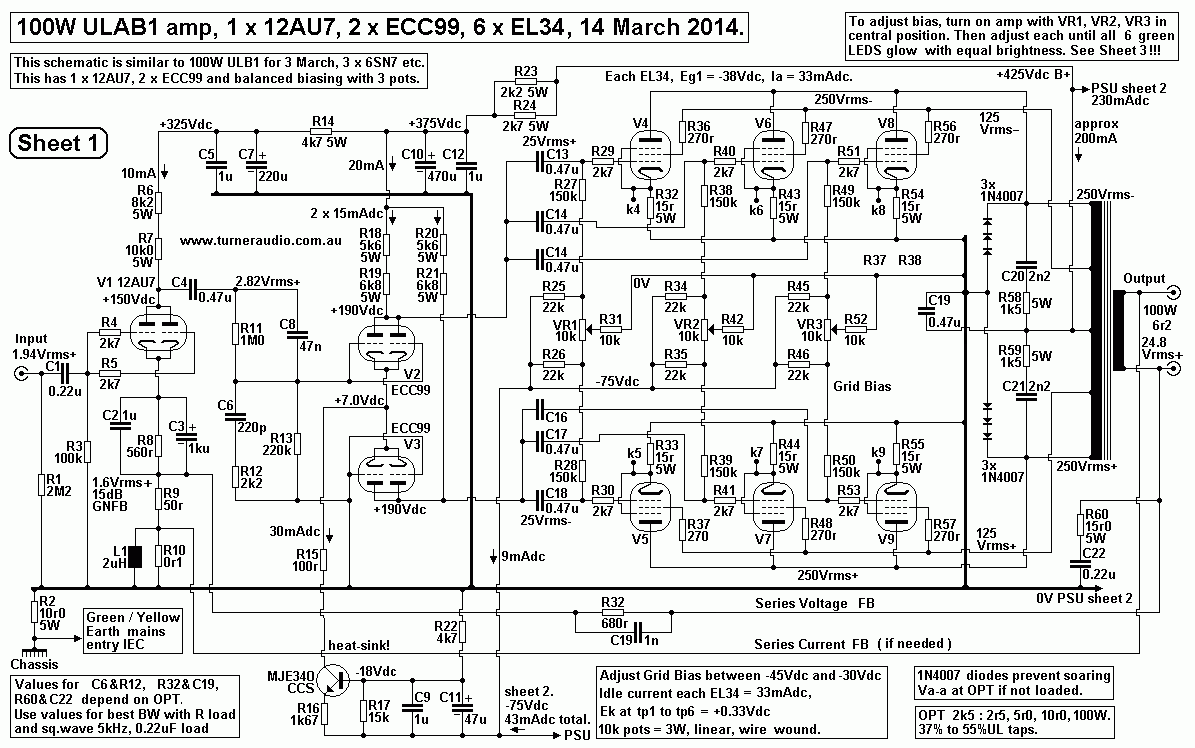
Fig 5 is very similar to Fig 2 but input is 12AU7 and LTP is
formed with 2 x ECC99 which
I have never used but which should work as well as EL84 in triode.
----------------------------------------------------------------------------------------------
Replacement of all output tubes and bias adjustments :-
Amp is cold, and has been turned off for at least 1/2 an hour.
1. Remove all 6 old output tubes.
2. Adjust all 3 balance pots to center position.
Make sure preamp is turned off, or gain is turned down to zero.
Make sure a speaker is connected.
3. Plug in 6 new EL34.
4. Turn on power amp.
5. Watch each and make sure all 6 have heaters glowing. Notice
that all 6 green LEDs should glow equally bright at turn on.
6. LEDs will begin to change brightness after 20 seconds and then
some will turn off,
then on again. This is expected behavior before any balance pot is
adjusted because the rate of warm up varies between tubes.
After 30 seconds you may see only 3 LEDs of the 6 alight.
7. Adjust one pot until you see the two nearest LEDs glow equally
bright.
Then adjust the next pot and the next until you see all LEDs
glowing equally.
The amp is ready to go. For those worried about the real tube
condition, they may use a digital
voltmeter set to Vdc and measure test points k4 to k5, k6 to k7,
k8 to k9.
All 3 measurements should read less than 0.05Vdc, and if not,
adjust balance pots more finely.
Then measure from all 6 test points to 0V and you should read
0.525Vdc +/- 0.05Vdc.
8. After an hour you may find one or two led of a pair has faded
to less bright than its other.
re-adjust balance pot to equalize brightness. Further variation
should not be needed for days or weeks later. You do
NOT have to re-adjust pots each time you use the amp, there will
always be some variation in idle currents until tubes have fully
warmed up.
9. Music may be played after the first 30 minutes. But next day
you can play music a minute after turn on. 10. It will be noticed
that very high sound levels with some clipping may cause LEDs to
change brightness or flicker. This indicates pairs of tubes
have temporarily unbalanced Ia clipping. At sensible lower levels
the should be little change in led brightness and even
though the average value of Iadc flow through tubes has risen in
class AB1 working, it should be the same in each balanced pair
of EL34.
10. If the LEDs for 2 EL34 cannot be balanced by turning the pot,
it means one tube of the pair is faulty. Replace one EL34
and if the tubes balance, the one you pulled out is likely to be
faulty, If the tubes don't balance, it means the tube that was not
replaced is faulty. When that is replaced, balance should be
possible with pot set somewhere near the middle of the turn range.
Severe overloading may cause red LED 1 to turn on and all 6 green
LEDs to turn off. The protection circuit is telling you
"enough is enough you bloody idiot!"
Many audiophiles are very uncertain about biasing their amps and
they sometimes get all mixed up about which tube they biasing,
and which pot of many is associated with a particular tube. They
cannot use a voltmeter. They don't know what to do when a tube
finally becomes faulty towards the end of its life. My past
customers used to just ring me up, and I would advise them over
the bother.
It seldom happened with my protection circuits because they get
used to coping, and with the bias balance indication, all an
audiophile really ever needs to do is "turn all pots until all
green LEDs glow equally".
If I was to make a 100W UL monobloc now, I'd consider using 4 x
6550, KT88, KT90, KT120 instead of 6 x EL34. If the amp is
designed for KT120, and has B+ at +425V, then 6550, KT88, KT90 may
also be used with the same Eg1 biasing and same Ia
and Ig2 and Pda+Pg2 of 23.3Watts at idle, and Po will be very
nearly the same. The KT120 need 2.1Amps for heaters, 0.3A
more than the others.
Fig 6. 100W UL AB1 amp with 1 x 12AU7, 2 x ECC99, 4 x
KT120.
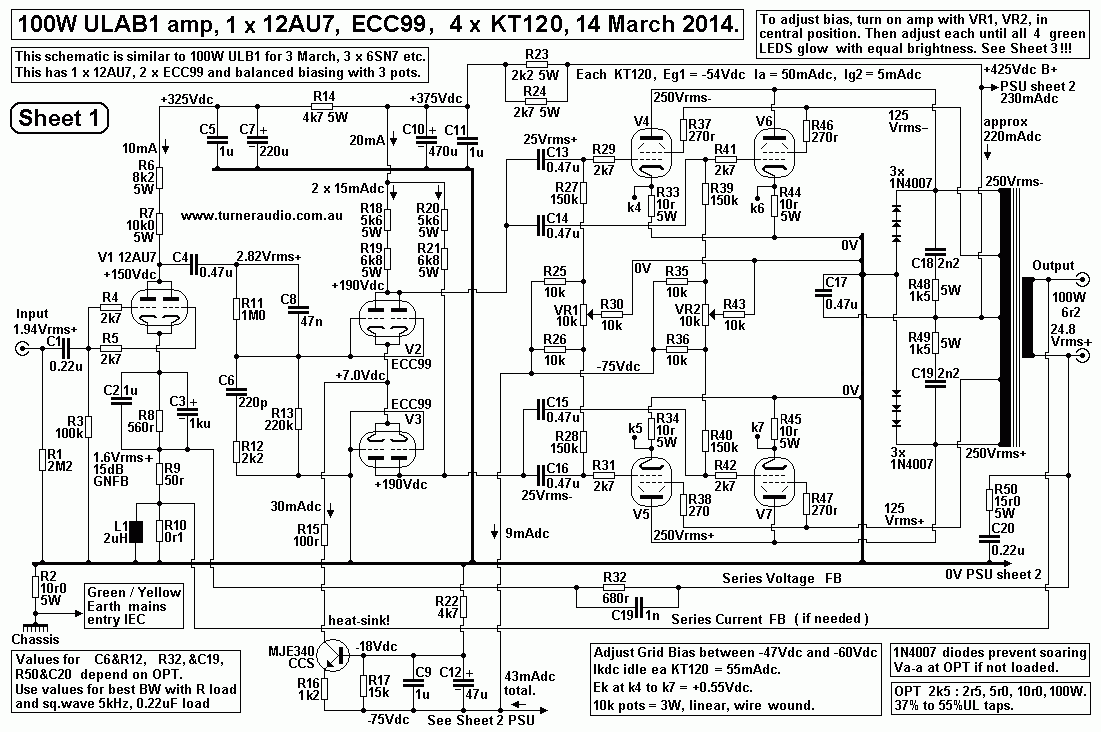
The sound quality from this amp should be little different from
using 6 x EL34. The pair of KT120 on each side of PP
output circuit can produce a maximum total peak current in class
AB1 = 1.3Amps. 3 x EL34 would manage 0.75Amps.
This means that the KT120 will drive a lower speaker impedance.
However, the total idle Pda for 6 x EL34
= 6 x 425V x 0.029A = 74W. Total Pda for 4 x KT120 = 4 x 425 x
0.05 = 85W, so there is very little difference in the
maximum possible pure class A which would be 33W for EL34, and 38W
for KT120.
I've shown only one PSU schematic and one protection schematic but
there are 4 amps on this page so If you make
one of the amps, you need to make minor adjustments to the PSU and
protection circuits. Remember that the balanced
biasing networks for EL34 and 6CA7 will produce a lower negative
bias and cannot be used for KT66, 6L6GC, 6550,
KT88, KT90.
---------------------------------------------------------------------------------------------------------
The basic OPT specification is for 100W+ rated with UL taps
between 25% and 50% and for ZR = 2k5 : 2r5, 5r0, 10r0.
The secondary ohms are lower than nominal 4r0, 8r0, 16r0 because
nearly all loudspeakers have a minimum ohm load
value which is lower than the nominal one mentioned by the maker.
Fig 7.
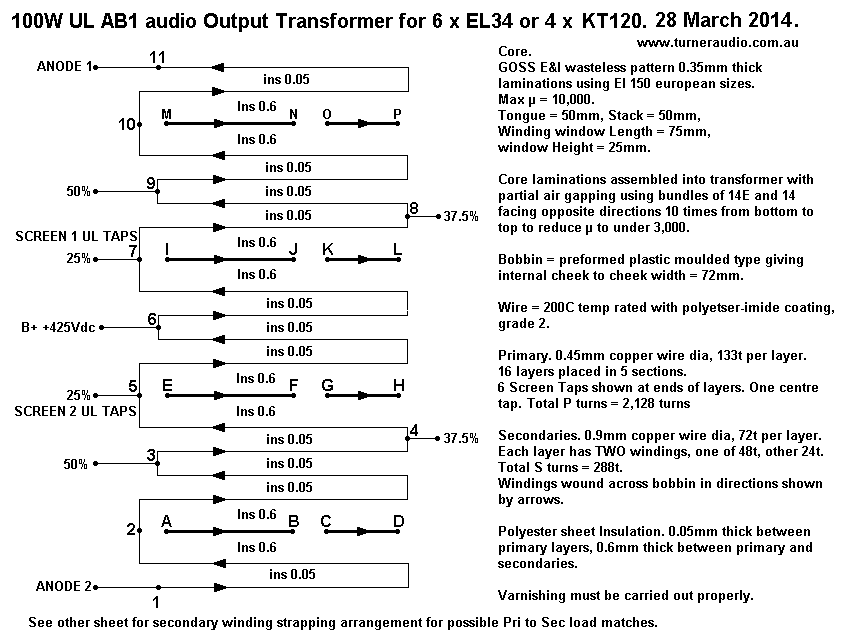
Fig 7 has details for a suitable OPT. It is a drawing for winding
the bobbin and gives details on the core,
the winding wire and insulation and winding patterns.
The total height of the wire and insulation is :-
Primary, 16 layers at 0.52mm oa dia wire = 8.32mm
Secondary, 4 layers at 0.99mm oa dia wire = 3.96mm
0.05mm insulation P-P, 11 layers at 0.05mm = 0.55mm
0.6mm insulation P-S, 8 layers at 0.6mm = 4.8mm.
One 0.6mm cover layer over completed winding = 0.6mm
Total winding height = 18.23mm.
The CORE window = 25mm x 75mm and the available bobbin window =
22mm x 71mm.
The turns must be neatly wound on in layers without ANY wires
crossing over others and subject
to forming a shorted turn in future.
There are multiple secondary windings which can be arranged in
various way to change the load match, while
maintaining the same wide bandwidth, and winding loss % for all
values of nominal loads, and maintaining
unconditional stability with a global NFB loop which does not need
to be adjusted when changing OPT load matching
strapping pattern.
There is no acceptable way to use the 8 secondary windings on this
OPT arranged as a "tapped secondary".
An OPT with a tapped secondary needs to have the same number of
secondary sections, each with enough turns
to provide taps to 4 amp output terminals, for 2k5 primary RLa-a :
Common, 2r0, 4r0, and 8r0.
If the primary remains unchanged as I have it above, and low
winding losses are to be maintained, each tapped secondary
would need to have 2 layers of 72t x 0.9mm Cu dia wire, so that
both layers of 144t = 8r0, a tap at 100turns = 4r0, and a tap
at 72 turns = 4r0.
The trouble is that if double the number of secondary layers were
used, the total winding height would increase and 0.6mm
must be reduced to 0.3mm, giving winding height 19.89mm which will
barely fit into core window height. There is slight risk
of arcing from P to S, and the shunt capacitance is doubled and
leakage inductance increases.
Most winding tradesmen will find difficulty fitting the total
winding height into window height because as the turns are
wound they do not lay flat but tend to bulge up a couple of mm
when wire is bent around the bobbin.
For tapped secondaries with equal performance to the subdivided
windings I show, the OPT need total re-design.
The core material should be E&I Grain Oriented Silicon Steel
laminations 0.35mm thick.
Most OPTs are made with this material but the makers usually place
the Es and Is into the wound bobbin with each in alternate
directions. This gives the finished core a permeability, µ, of
between about 9,000 and 17,000. While this ensures the primary
inductance is a huge Henry value, if ever the Idc on each side of
primary becomes slightly imbalanced, then the core may easily
saturate with a small unbalanced Idc flow in one direction.
The core µ does not need to be above about 3,000, and to achieve
the lower µ the Es and Is must be gathered in bundles of say
10 to 25 laminations and then all bundles are inserted to core in
one direction while the next bundle is inserted in the opposite
direction.
This is called "Partial air gapping" where there is no actual
complete air gap. Laminations are thus not maximally interleaved.
A minimum complete gap with all Es facing the same way and butted
to all Is would reduce the µ to about 1,000, which is too
low to have sufficient primary inductance for a PP amp. The wanted
µ is 3,000, and the only way to achieve this is by trial and
measurement by inserting the lams in say bundles of say 25 lams
and then measuring the inductance with 240Vac at 50Hz
across the whole primary.
A 10r0 series R is used to measure current, and the reactance of
the coil = Vac / Iac.
Inductance = Reactance ohms / ( 6.28 x 50Hz ).
From this measurement the core µ can be calculated with the
formula for inductance and you'll have to visit my Push Pull
OPT design pages.
I believe the lower µ achieved this way conveys the benefits of
low distortion generated by the GOSS but avoids the problems
of Idc offsets, so sound is better.
Fig 8.
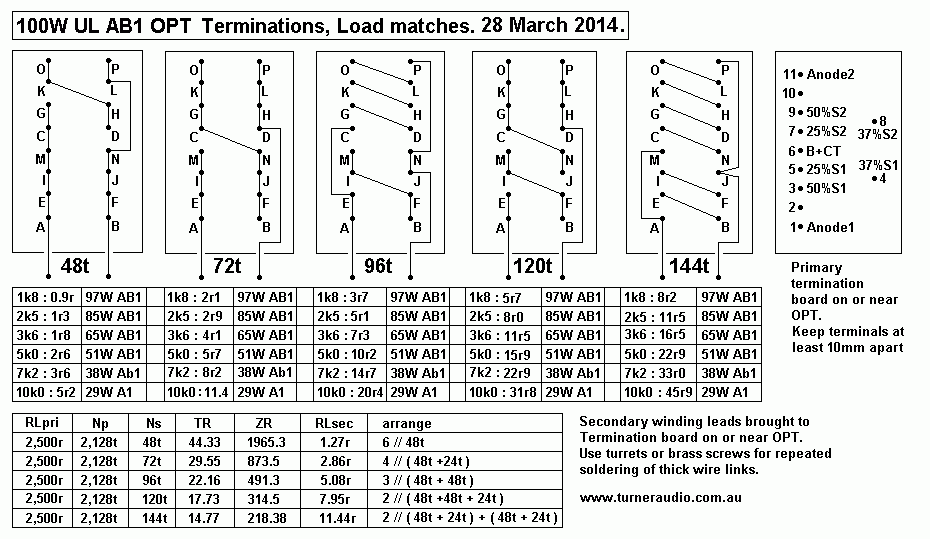
Fig 8 shows 5 different strapping patterns for the total of 8
secondary windings.
I suggest the pattern of connections from A to P be established on
a board mounted on the open frame E&I transformer
bobbin, so short length secondary winding leads can be led to the
terminals. There must be easy access to the
secondary terminal board with easily removable screwed transformer
box covers, or some other hinged panel on
transformer case, facing the rear of the amp.
The primary terminations can also be on a similar board but on
opposite side of bobbin to secondary winding leads.
There will be little need to access these connections.
Some amp makers use 3mm thick fibre glass board mounted between
the OPT and the chassis top.
This has an added benefit of providing a non magnetic gap between
OPT and the steel top of chassis.
This single board has the same size as the plan area of OPT and
wire leads from bobbin can be brought down
to two rows of terminals in the board. Best terminals are not
turrets, but 25mm long 2mm threaded brass rod with nuts
each side of board to allow wrap around soldering of wires to each
10mm of rod on each side of board. Unlike turrets
with rivet fixing, the brass rods will never come loose when
threads are soldered.
The chassis top will have TWO slots maybe 25mm x 80mm, to allow
protruding OPT connections to enter the
under chassis area but without taking up valuable space for other
components. 16 secondary winding terminals are
required and the slow allows 2 rows of 8 terminals. Once the
chassis bottom cover is removed, ALL OPT connections
are accessible and the wiring up of the circuit and servicing are
both easy.
Quad-II had such a convenient arrangement.
I believe my method of using multiple secondary windings with wire
links allows the vast majority of speaker loads
between 1r0 and 45r ohms to all be driven by the tubes in high
power Class AB1, or in low power Class A1, to suit
owner preferences.
Happy soldering, and try not to get confused with too much
information.
Back to Power Amps
Back to Education and DIY
Directory
Back to Index Page